A CSS Walkthrough
This CSS walkthrough was written by Christian Montoya for those interested in learning CSS. The final outcome of this tutorial will be a complete one-page design suited to handle various forms of content and featuring a few extra details.
In case you are wondering, a ZIP file is available at the end of this tutorial. It contains all files in this tutorial, including all the steps. You can step ahead and get it now, but I recommend walking through the whole thing first and following along.
 This work is licensed under a Creative Commons Attribution-ShareAlike 2.5 License. This license covers every page related to this walkthrough, as well as all CSS, HTML, and image files.
Getting Started
Every design starts with a draft, and this one is no different:
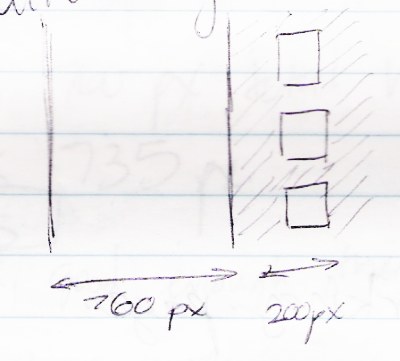
Not a very detailed draft, but a starter nonetheless. You can see I'm planning a main column 760 pixels wide, another column of blocks extending 200 pixels farther, and a background with diagonal lines to make everything look sharp. The blocks on the right will hold some small images, and each block is 150 pixels square. The images will be 140 pixels square.
Things Every Webpage Needs
These are the things I start my webpage with:
- A doctype, in this case "HTML 4.01 Strict." Doctypes ensure that the browser or other machine viewing my page knows what standards to follow when displaying it.
- An html tag with the language defined as English (en).
- A head section for information machines will use.
- A title tag, with whatever title I choose.
- A meta description tag, which gives search engines a description for my page.
- A meta keyword tag, which contains some keywords related to my page.
- A link tag to my stylesheet, which I will use to design my page.
Here is all this as HTML markup:
<!DOCTYPE HTML PUBLIC "-//W3C//DTD HTML 4.01//EN" "http://www.w3.org/TR/html4/strict.dtd">

<html lang="en">

  <head>

    <title>My Cornell People Page</title>

    <meta name="description" content="A personal page for a Cornell student.">
    <meta name="keywords" content="cornell, college, university, resume">

    <link rel="stylesheet" type="text/css" media="screen" href="style.css">

  </head>
Structuring Content
I will use a div tag to hold the main body of my page. You can think of a div as a container that can hold anything you want. I will also use an unordered list (ul) to hold the small pictures on the right of my page. This way they will be associated with each other and easy to style.
As of now I have a working page with some default content: step1.html. The div and the list have IDs to define them as specific elements so I can target them later. The images are added with "img" tags and each one has an alt attribute that describes the image to users who can't see them.
I just have a small amount of markup so far:
<div id="pageContent">
  <p>This is where my page content will go.</p>
</div>

<ul id="pictures">
  <li><img src="pic_1.jpg" alt="A photo of McGraw Tower, the belltower at Cornell University"></li>
  <li><img src="pic_2.jpg" alt="A photo of Cascadilla Gorge"></li>
  <li><img src="pic_3.jpg" alt="A photo of flowers on the Agriculture and Life Sciences quad"></li>
</ul>
In the next part, I will begin to style this page. Move on to part 2.